Crunch and Hold Leg Scissors

I have a core exercise for you for the Home Exercise of the Week.  It’s called Crunch and Hold Leg Scissors and if you’re familiar with Pilates then you’ll notice a similarity with this one.

Crunch and Hold Leg Scissors will work your lower abdominals as well as your hip flexors and for an added bonus the crunch and hold will isometrically work your upper abdominals.  So you know what that means….muscle burn time!

Let’s take a look at the key points to doing Crunch and Hold Leg Scissors properly.

  • lay face up on your mat and raise your legs to a 45 degree angle keeping them as straight as possible.
  • reach towards your toes with your hands by crunching up until your shoulders are off the floor.  Avoid going too high as this can strain your back and avoid tucking your chin in to your chest.
  • while holding the crunch, lower one leg until it is about an inch or two off the floor then return to the starting position and repeat with the other leg.
  • ensure that you are pulling your belly button in towards your spine to achieve optimal ab contraction and to avoid straining your lower back.
  • if you find that your back is arching or hurting while doing this exercise then don’t lower your legs as far down.  You can also just do a crunch while holding your legs up and not doing the scissor movement.

So there you have Crunch and Hold Leg Scissors.  Get those abs burning by adding a couple sets of 20 to 30 repetitions to your ab routine or add it in to a superset to get an even bigger metabolic boost!


Jump Squat and Hold

Hey there HomeBody followers!  If you find your leg workouts getting boring or too easy (ok, too easy is probably not possible) and you want to shake things up a bit then give this Home Exercise of the Week a try.

Jump Squat and Hold – There are a few different aspects to this exercise that will challenge your quadriceps, glutes, hamstrings, and calves in ways that standard squats just can’t do.  Regular squats are awesome and you will get great results and strength from doing them but with the Jump Squat and Hold you get the benefit of plyometric and isometric training.

Plyometric exercises will build explosive power, increase your metabolic rate, burn more calories, and strengthen your cardiovascular system.  Isometric exercises burn fat and build muscle and don’t place a lot of stress on your joints.

Before you jump right to the exercise (pun intended) and start feeling that lactic acid buildup, let’s take a look at how to do this exercise properly.

  • start with feet shoulder width apart and toes pointed out slightly
  • squat deep down keeping your head and chest up with shoulders back
  • keep your knees in line with your toes
  • from the deep squat position, jump up in the air as high as you can and with as much force as you can muster
  • land back down and immediately go back in to the squat position but this time hold the squat for 5 to 10 seconds
  • while holding the squat, extend arms out and raise them up to shoulder height.  This will give you a bonus isometric anterior deltoid (front shoulder) exercise
  • after holding the squat, jump back up and repeat

So there you have the Jump Squat and Hold.  Kick your metabolism in to high gear with this one and even try changing up the exercise a little to keep your body guessing.  For example, you can do this by doing 5 jump squats before the hold or extending the hold for longer than 10 seconds.  There are many combinations you can do but whatever you choose, have fun and work hard!

In and Out Squat Jump

The holidays are fast approaching so get a jump start (no pun intended) and burn some calories with this plyometric Home Exercise of the Week!

The In and Out Squat Jump…talk about a leg burn!  You’ll be sweating, your heart will be pumping, and your legs will be on fire with this one.  Sounds fun doesn’t it? 🙂

Aside from all the uncomfortable side effects of this exercise you will really build some explosive strength and endurance since the In and Out Squat Jump is a plyometric exercise.  When your feet are together you will be working your outer thighs and when your feet are wide you’ll be working your inner thighs.  Your glutes and hamstrings will also be working hard too.  So overall this is a great exercise to add in to your leg or full body routine and the cardiovascular aspect to it will really rev up your metabolism and burn calories…much needed before the surplus of calories that usually come with the holidays!

Let’s take a look at the key points to doing the In and Out Squat Jump properly.

  • whether your feet are close together or apart, when you come down in to the squat make sure that your head and chest is up, back is straight, and your weight is on your heels.  Always make sure your knees are over your toes and not shooting out past them.
  • start with your feet together and explode up in to the air spreading your feet apart and landing softly in the wide stance
  • explode up again but this time bring your feet together and land softly in the close stance
  • with each squat try to get your thighs below or at least parallel to the floor

So there you have the In and Out Squat Jump.  A 12 to 15 repetition set is a good starting point and if you want an extra challenge hold on to some dumbbells!

Keep working hard and don’t forget to treat yourself over the holidays.  That being said, stay active and it will be that much easier to get right back on to your routine in the new year! 🙂

Three Close Grip Pushup Superman

This week I have a combination exercise for the Home Exercise of the Week.  Combination exercises are great to add an extra challenge to your workout and you can target many muscle groups in one move.  The more muscles being used the more calories you will burn and the higher your metabolism will be.

The combination exercise I would like you to try this week is the Three Close Grip Pushup Superman.  I say three pushups but you can definitely do more or less before the superman.  The idea here is to do enough rounds of this in a set so you get around 10 to 15 total reps of each.

With the Three Close Grip Pushup Superman you will be working your triceps and lower back muscles primarily but you will also be working your chest, shoulders, and upper back muscles.

Let’s take a look at the key points to doing this exercise properly.

  • start by doing the pushups from your knees if you find you can’t go down all the way on the pushup portion of the exercise.  You can build up to doing the pushup from your toes over time.
  • keep your abs tight and body straight the whole time (no bending at the waist)
  • throughout the pushup you will want to keep your elbows tucked in to your sides…this will allow your triceps to do most of the work
  • keep your head in line with your spine throughout
  • during the superman part of the exercise keep your arms straight out in front of you and raise them up as high off the floor as you can while at the same time lifting your straight legs up as high as you can
  • hold the superman for a second or two then go right back to your close grip pushups

So there you have the Three Close Grip Pushup Superman.  Your lower back and arms will thank you for this one but I’m fairly certain you won’t be thanking me once you add this to your routine! 😉

5 Exercises to Avoid – Part 5

If you have been following along with my series on exercises to avoid at the gym you’ll know that I have talked about all leg exercises so far.  This week though in the final part of the series, I would like to share an upper body exercise that might not be as effective as you thought.

The exercise is the Biceps Preacher Curl and although it is a good bicep builder and isolation exercise there are a few drawbacks that could lead to injury down the road.
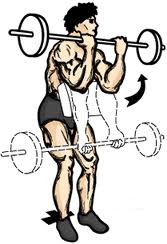
Dr. Kareem Samhouri (a Neuro Metabolic Fitness and Rehab Expert) points out that from a muscle balance perspective, the forward shoulder position of this exercise leads to an increased stretch on the rotator cuff and biceps tendon.  The position of this exercise creates an imbalance between your pecs and lats/shoulderblade stabilizers resulting in a forward shoulder position. This leads to rotator cuff tendonitis, biceps tendonitis, and an increased risk of tears.

This is true for your shoulders and neck.  In this forward position, you are at risk for injury.  Also, like many people who perform this exercise, you may be placing excessive weight into your armpit, which is where your brachial plexus is.  This is the bundle of nerves that controls your arms.

Also, the biceps are being shortened in an over-shortened position for your pecs, reinforcing a common imbalance.

The elbow is only safe when balanced and this is achieved when all the elbow flexors are being worked.  The elbow flexors are your biceps, brachialis, and brachioradialis.  These muscles flex your elbow and allow you to rotate the palm of your hand up and down.

Second, there is no functional benefit to doing this exercise.  This is an artificial movement in an abnormal position.  The only purpose to doing the Biceps Preacher Curl is to build the biceps but they only work on elbow flexion.  The biceps is also a supinator (meaning it turns your palm up), so by doing the preacher curl you’re missing 50% of the muscles action.

Finally, the metabolic effect of this exercise is low as it is an isolation exercise using only one part of the muscle.  You aren’t going to be burning many calories by doing this exercise and if your goal is fat loss then there are far more functional bicep exercises you can do that will get your heart rate up.

So what can you do instead?

A great exercise you can do that will hit all of your elbow flexors is the Curl Up, Hammer Down.  The first half of this exercise works your biceps and the last half works your rotators and forearm muscles.
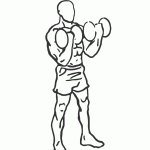
To perform this exercise properly, stand tall with your shoulders back and knees slightly bent.  Keep your elbows at your side with your palms facing out.  Curl up slowly getting a good squeeze on the biceps and then in the top position, you’ll want to turn your palms towards each other.
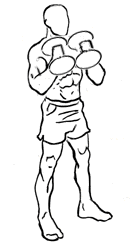
 

When your hands are in this position it will kind of look like a hammer.  Maintain this position as you slowly lower the dumbbells back to the starting position.

So there you have it.  Another exercise to avoid next time you hit the gym and what you can do instead for a more functional, safe, and effective workout.  I hope you have enjoyed this series over the past 5 weeks and I hope that the next time you workout, the more effective exercises I have shown you will bring you one step closer to reaching your fitness goals!